


Widely used for needlepoint for more than a century, Penelope canvas can aid in the creation of highly detailed stitched designs. Most canvas used today is mono canvas, with a single warp and weft. Duo, or Penelope, canvas has both the warp and weft doubled, so that stitching can be done with both elements considered as one, or split apart to make smaller holes. The doubled threads make Penelope canvas strong and led to it often being used for upholstery, but the main benefit of using Penelope is that some areas can use smaller stitches to provide greater detail, and other areas (often a solid colored background) can use larger stitches, which can be completed more quickly. This is sometimes called petit point and gros point (small and large stitches). Though the popularity of Penelope canvas has waned in the United States, it remains popular in Europe.
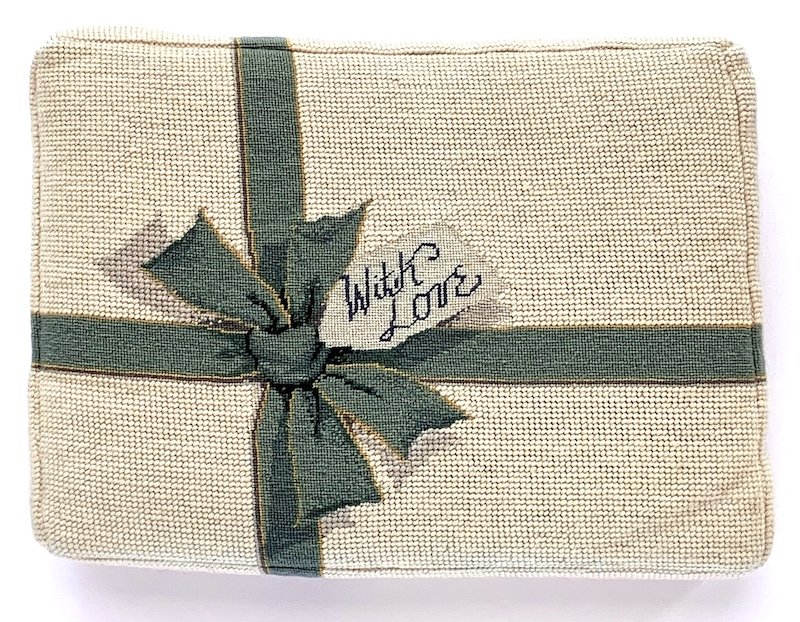
Vintage needlepoint pillow, circa 1960, stitched on Penelope canvas. The ribbon and tag are stitched with smaller stitches (20 stitches per square inch) and the solid background uses the larger holes (10 stitches per square inch).
In my quick research I’ve not found a solid explanation as to why this canvas is called ‘Penelope’ (or when that name was assigned). In the 1854 Handbook of Needlework, author Miss F. Lambert of Philadelphia wrote that Penelope canvas was ‘so called from its appearance of a canvas from which the work has been unpicked’ (page 73). This alludes to the story of Penelope, the loyal wife of Odysseus in Homer’s Odyssey, who would weave and unweave the same section of her husband’s shroud in order to stave off suitors (she told them she would answer their proposals when she finished her weaving). I’m not sure how Penelope looks more unpicked than any other canvas, but this is the earliest explanation I have found.
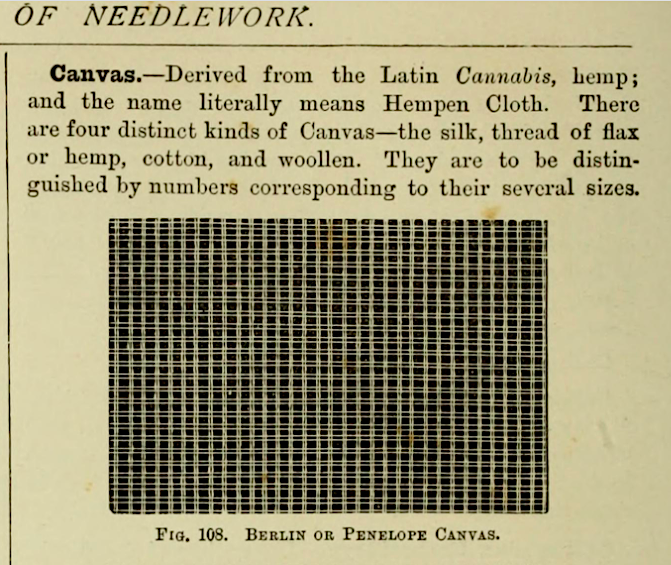
From Caulfeild and Saward, The Dictionary of Needlework, London, 1882, page 60.
Penelope canvas had been used in some form since at least the early 19th century. By the mid 1800s, with increased industrialization, companies such as DMC (founded 1746), Sajou (founded 1830s), Bucilla (founded 1867), and Zweigart (founded 1877) developed standardized needlework products that were widely available in Europe and the United States. The popularity of Berlin wool work—a style of needlework on canvas that utilized naturalistic depictions of flowers, animals and other motifs—was aided by the growing availability of the supplies needed to execute the work, and the prevalence of printed patterns. In 1882, The Dictionary of Needlework by Sophia F.A. Caulfeild and Blanche C. Saward (London), called duo canvas ‘Berlin or Penelope’ canvas, indicating the pervasive use of this type of canvas for Berlin work.

Partially stitched slipper front on double canvas, British, circa 1860, V&A Museum, object number T.236&A-1969. Note the face stitched on the smaller holes of the canvas (I’d guess this is smaller than 10/20—maybe 12/24? Smaller?).
Today, Penelope is available from Zweigart in 10/20 count, meaning that the large holes created by the doubled warps and wefts make 10 holes per inch, and when split apart, the same canvas has 20 holes per inch (one intersection splits into four smaller intersections). Smaller sizes were also made in the past, down to 20/40.
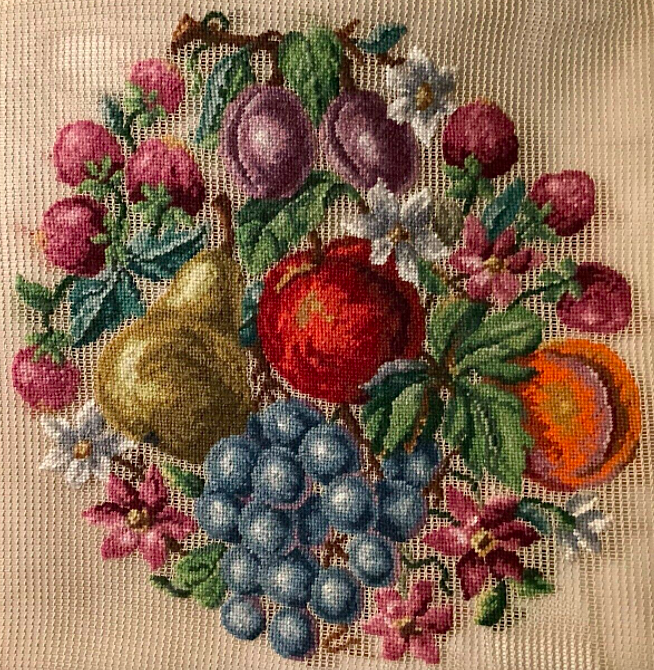
Vintage Bucilla preworked Penelope canvas, circa 1960, via eBay. Preworked canvases were made as early as the 18th century, and gained great popularity in the mid-20th century. The canvases were often intended for use as chair seats, with a central motif of flowers or fruit. Leaving the background unstitched allowed the buyer to match the color to their decor. In the past, many preworked (and trammed) canvases were made in Madeira, Portugal; today, production has shifted to China.
How to Use Penelope: Preparing the Canvas

Stretcher bars keep the canvas taut.
[A disclaimer--I taught myself how to use Penelope canvas, so what follows is what has worked for me. Looking at books from the 1960s and '70s has yielded surprisingly little advice on how to use this type of canvas!]
I recommend mounting the canvas on stretcher bars to help prevent distortion as much as possible. When using Penelope canvas, you will literally be moving the elements of the canvas around, and keeping the canvas taut makes expanding the canvas to the 20 size a bit easier. Still, if you prefer to work in hand, do whatever works best for you! Some people like to scoop when stitching and that can be a great way to go, especially when filling in the background.
Needles
For 10/20 canvas, I use the same needles I use for 13 and 18 canvas: 18 size tapestry needles for the larger holes, and 22 size tapestry needles for the small holes. You could also go to a smaller 24 size needle, but I like the bigger sizer to help push the canvas apart.
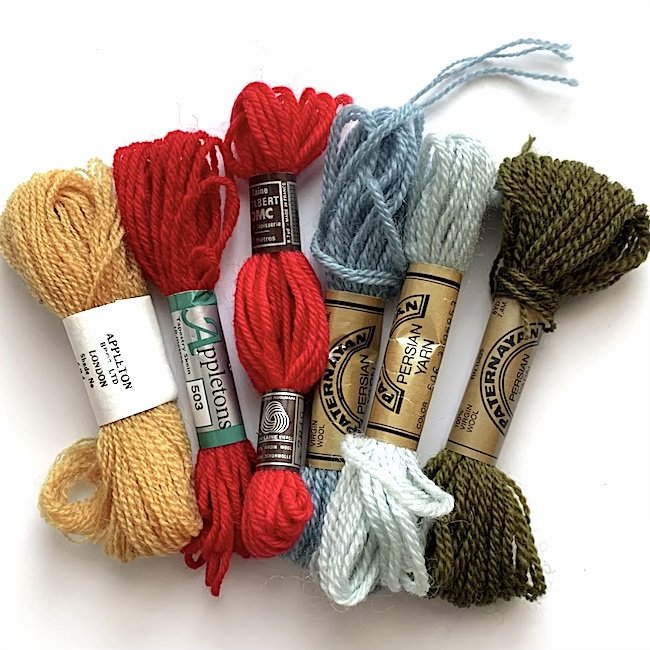
A selection of wool options for Penelope: from the left, Appletons crewel and tapestry wools, DMC tapestry wool and Paternayan persian-style wool (three strands).
Threads
As with most needlework, your choice of threads is highly personal depending on your preferred fiber, tension, etc. Wool, silk, and cotton options will all work. I find that the choices are more plentiful for the smaller gauge holes—most of what works on 18 canvas will work for 20 canvas. Silk, crewel and other wool, and perle cotton (size 5 can be a bit tight, but I have used) all stitch up well. Strandable threads allow you to find the right mix of ease of stitching and canvas coverage.
A bit more challenging are threads for the 10 count areas. Tapestry wool, a non-divisible, four-ply yarn, is perhaps the best choice if you are filling in the 10-count holes exclusively, as with many pre-worked canvases (more on compensation coming up). Companies such as Anchor, DMC, and Appletons make tapestry wool, but some of these are sized better for 12 or 13 canvas, so light tension would need to be used to insure good coverage (I like full coverage, I don’t want to see any canvas at all). You can definitely mix fibers and brands in a single project!
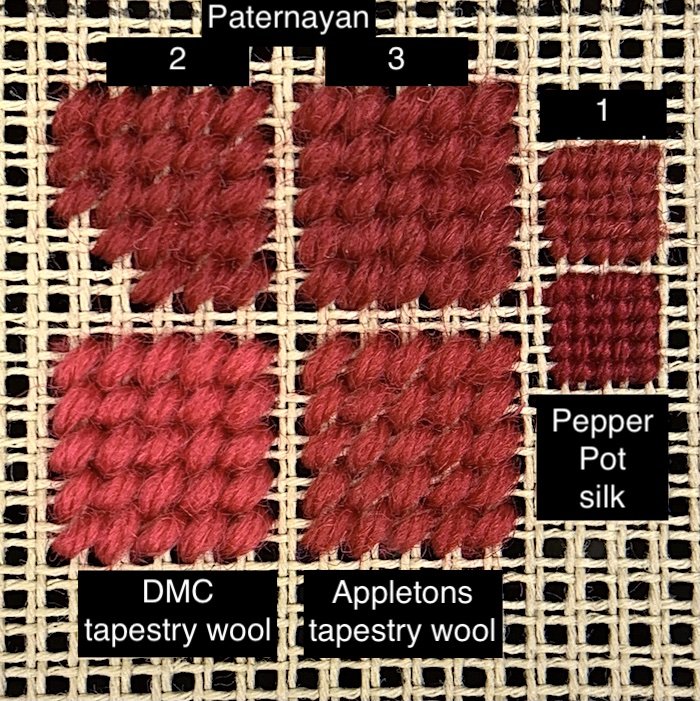
5 x 5 stitch squares showing coverage. One strand of Paternayan works well for the 20 count areas; three strands is a bit tight for the 10 count areas, and more difficult to keep the strands neat. I tried 2 strands to see how it worked—it was definitely easier to stitch, but did not provide good coverage. Appletons tapestry wool seemed a little skimpy; DMC gave good coverage and was easy to use (it is also widely available and comes in many colors). I didn’t have any Anchor on hand to test, but it generally gives good coverage on 10 count canvas.
I am weirdly old school and enjoy using vintage Paternayan wool—a Persian (three strand) wool where one strand can be used on the 20 count areas, and all three strands can be used on the 10 count areas. This ensures color consistency throughout the project, which is critical if you have areas of compensation. While a new incarnation of Paternayan is now available through Colonial Needle Company, I’m an antique dealer and in my travels I come across vintage Paternayan and other brands that are well suited to Penelope canvas. Scovill Dritz, Bucilla and others are great (and often economical) choices, but can be difficult to find in the colors and amounts needed for a project (and believe me, there is nothing worse than running out of a vintage wool, the likelihood of finding it again is practically nil!).
I recently stitched a project using Waverly, a three-strand wool which operates much the same as Paternayan, with one stand for the smaller holes and two for the larger. Both were a bit tight, but it stitched up nicely and to good effect. Appletons also comes in both tapestry and crewel wool in the same colors and could work for the background and compensation.
Favorite threads for 10 count *only*--DMC Tapestry wool, Paternayan (3 strands), Waverly (2 or 3 strands), Anahera (3 strands), various crewel wools, including Appletons (number of strands depends on weight)
Favorite threads that work on both 10 and 20 count--Paternayan, Waverly, Anahera, Appletons crewel
Favorite threads for 20 count--Waverly (1 strand is a bit tight, but doable), Paternayan (1 strand), Anahera (1 strand), DMC Pearl cotton 5 (tight!), plus many of the threads that work on 18 will work on 20, especially those that are divisible like Bella Lusso or Splendor.
How to Work the Canvas
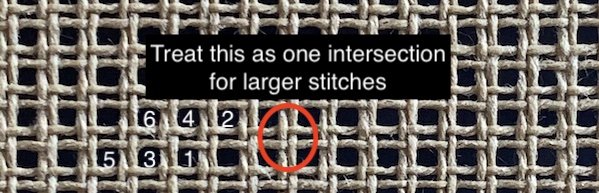
For me, working on Penelope canvas is mainly a matter of adjusting my eye to see the threads of the canvas doubled and stuck together for the big holes, or needing to push them apart to make more, smaller holes. One big intersection becomes four small intersections! It took a while for this to stick in my head, similar to when you first learn to basketweave it seems like such an odd concept, but then it clicks and becomes second nature. It's hard at first, but it gets easier!

Stitched area is done in DMC perle cotton, size 5 (a little bit tight, but still very workable). In the split apart section on the right, you can see how you can still ‘read’ the canvas as you would with mono canvas.
Usually, it is best to start working the areas of smaller stitches first. To use the smaller gauge holes, I open an area of the canvas before stitching. To do this, I use the needle to poke through every intersection in the next square inch or so to be worked. Some intersections are already pretty big, but the tightest ones can be a little tough to get the needle into (be careful not to split the warp/weft). I try to open up a little bit extra around the area I need to stitch in 20 to prevent distortion—the canvas tries to pull back to its original position. Once I’ve poked all the intersections, I look it over and try to straighten out the warps and wefts and make all the holes a similar size. This will help keep your stitches even.
You can definitely skip opening the intersections in advance of stitching, and just wiggle the canvas as you stitch, but I find it is worth the extra minute to do so (sticking your needle into the tightest intersection from the back of the canvas is not fun!).
Stitching
Generally, continental or half cross stitch are used on Penelope canvas. I will still use basketweave where possible. This is easier on the small holes, but more difficult on the larger holes, where the intersections do not easily ‘read’ with ‘steps’ and ‘poles’ to maintain the proper direction for basketweave stitching. I like the stability of basketweave, so I keep track of my direction and remain consistent throughout. As always, do what works best for you.
Reading steps and poles is not possible for the larger stitches.
Decorative stitches can also be used to great effect, especially in the background, including those that may ordinarily seem too small to easily cover a large area. Small stitches become big on 10 count canvas!
Backgrounds and Compensating Stitches
Even if you are using only tent stitches throughout your project, you may need to do a few compensating stitches. The area of small stitches needs to be an even number in order to smoothly transition to the larger stitches, so you will add a row of small stitches to even things out. You can see in the bee below that this can get a little challenging when small stitches are used for areas like the legs and antennae.
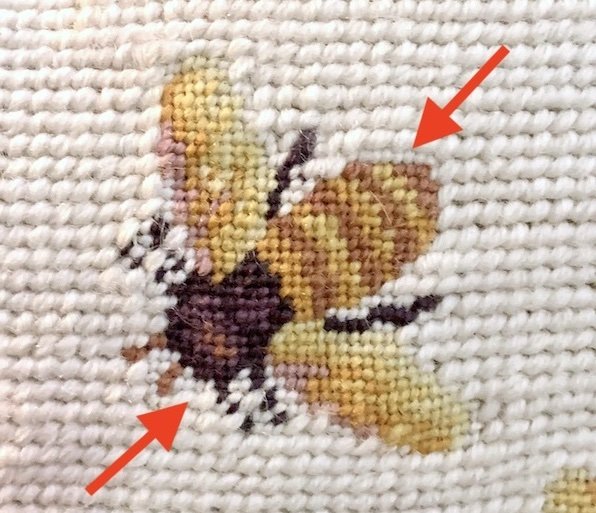
Detail of a vintage pillow on Penelope canvas showing compensating stitches around the design.
Tapestry wool is great for filling in backgrounds, but if you need to compensate around a design, Paternayan or another persian wool like Waverly, or crewel wool like Appletons, is your best bet. Paternayan has three strands that can be separated—three strands work for gros point, one strand for petit point. This way, the color of the background will be consistent.

A complete four-part intersection is needed to execute the larger background stitches. Where the petit point design has used only part of the four, compensating stitches must be added. After stitching the initials in this piece with smaller stitches, I then went around the perimeter of each and looked for intersections where any of the four clustered intersections were used and then filled those in.
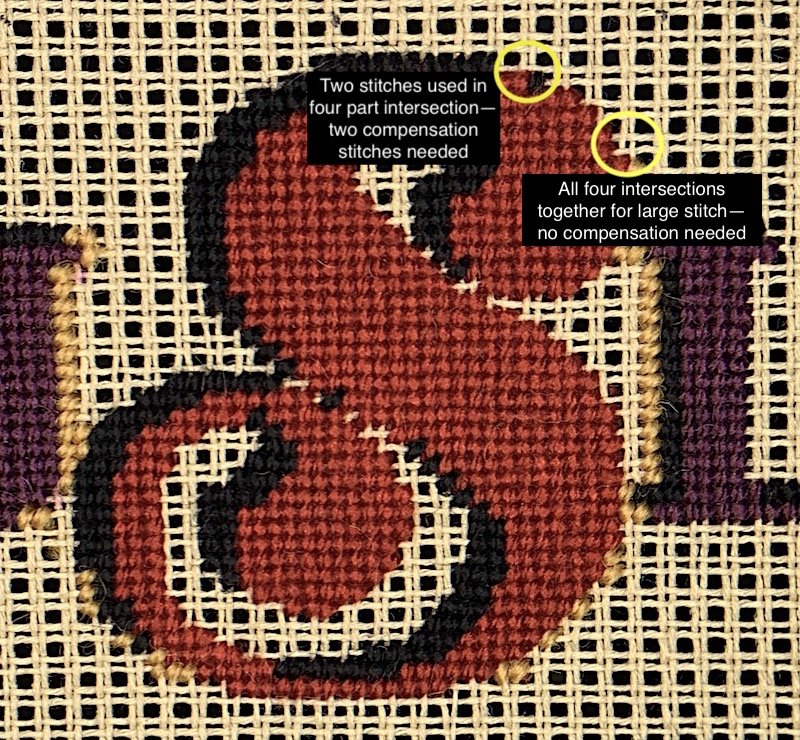
Detail of work in progress, with some compensation completed.
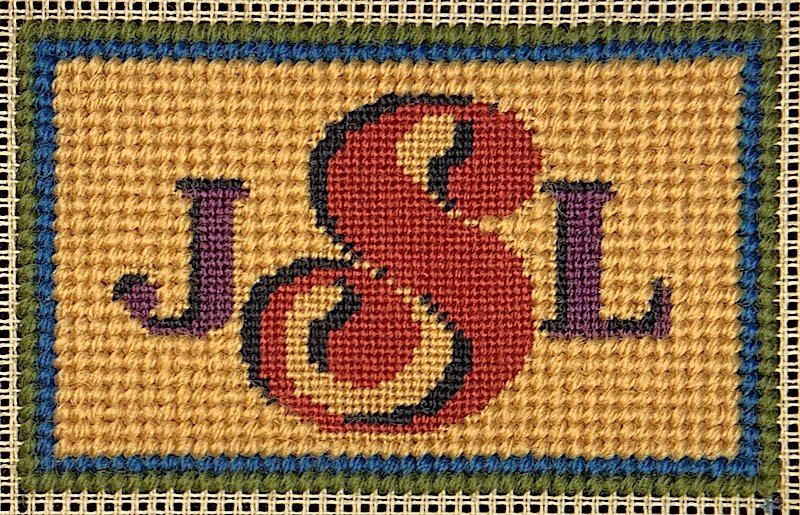
Completed piece showing compensation stitches. I chose to fill the areas inside the S entirely with petit point instead of having just a few of the larger stitches within. Stitched with Pepper Pot silk for the S, Vineyard Silk for the purple and black, and vintage Paternayan for the background.

I changed my mind in the middle of stitching this one--I stitched the U at the top right first and used the fewest number of small compensation stitches I could (they are more work!) and put larger stitches down the center of the U. I didn't love how that looked so I used more petit point at the center of other letters even though it wasn't strictly necessary because it gives a cleaner look. A minor difference!
Ideas for Using Penelope Canvas

I used Waverly wool (two strands on the 10 count section, one strand on the 20) and Fyre Werks for this zipper-top bag.

Detail showing compensation stitches.
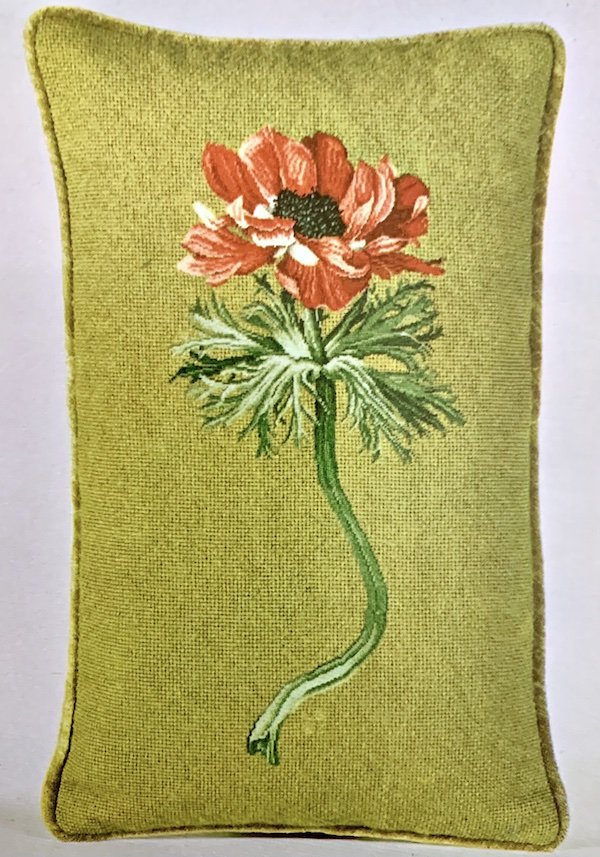
Anemone pillow stitched on Penelope canvas by Louis Gartner, 1960s. From Gartner’s Needlepoint Design, 1970, page 145.
Penelope is ideal for projects that have an area in the design that benefits from greater detail—something with a lot of curves or shaded areas, or tiny details like faces or hands—coupled with areas that can be executed with fewer colors or simpler patterns. Any motif that you might want to put on a solid color background, or one with a very simple pattern would be ideal, such as a monogram, a bouquet of flowers, or an animal. Projects can also be executed entirely in petit point on Penelope (or, Zweigart also makes Cordova, a mono canvas with 22 holes per inch). The strength of the canvas makes it ideal for furniture upholstery or other projects that will get heavy use.
Designing for Penelope
I use MacStitch for designing needlepoint. When thinking about projects for Penelope canvas, I setup one chart for the area of 20 stitches per inch, and if needed, a different chart for the 10 count area (in MacStitch, there is a petit point function, but only with letters). I definitely keep in mind how I will handle the transition from small to large holes—what sort of compensation will be needed and what thread will I be using to best accomplish that? If I wanted, I could try to create a design that avoided compensation stitches by keeping the count even, as with the basketweave and ribbon clutch.
Another challenge comes when transferring the design to the canvas. Penelope canvases are sometimes printed or painted with the design to be stitched, but not stitch painted/stitch printed as most canvases (in the US) are today. This means that a stitcher has to make decisions about where to use color with every stitch, using the design as a guide. The doubled warps and wefts make marking out the design more challenging if you are trying to stitch paint the canvas (or use indelible markers as I do). I am comfortable working directly from a chart without a canvas marked out stitch by stitch, but I’ve started with very simple designs so it hasn’t been so hard thus far.
If you have ideas about how to mark/paint the canvas, or other tips on how to use Penelope canvas, please share!
Unless otherwise noted, photos are by me.
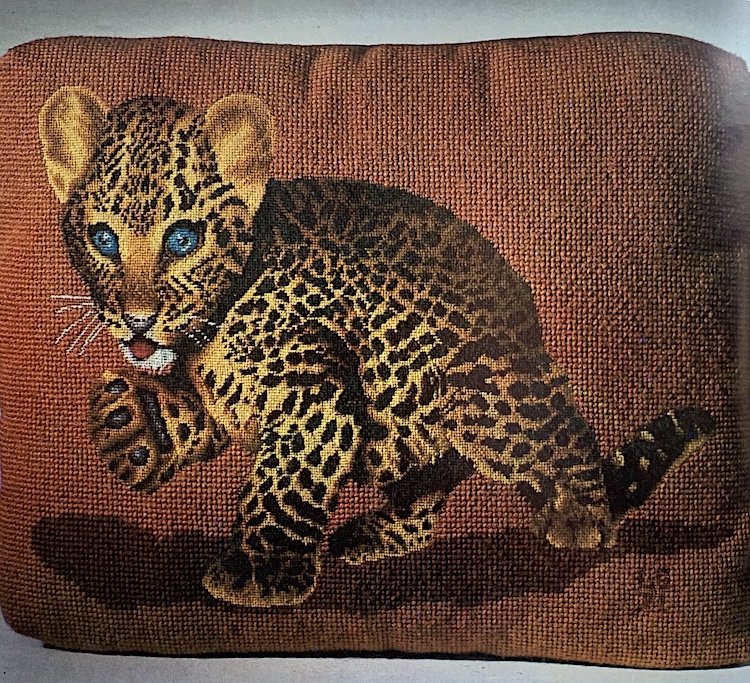
Louis Gartner, Jaguar cub pillow on Penelope canvas, 1971, from his More Needlepoint Design, 1975, page 18.
This takes me back to my childhood when my grandmother did needlepoint with the center completed. I remember when canvases came out without the center done my grandmother got so nervous. So we made a deal I did the center and she did the background. She taught me needlepoint at the age of eight and every time I start a new project of think of her. She was so amazing