


As you can tell from these designs, Turkey work is my favorite stitch these days. And it is certainly not a new stitch--it is a knotted pile structure similar to that used in many carpets. ‘Turkey’ carpets from the middle East became popular luxury items in Europe in the 15th and 16th centuries and resulted in needlework imitators that we still use today. This stitch essentially ties a knot around two intersections in the canvas and is therefore very stable.
Planning your Turkey Work
Before you start, it’s a good idea to make a plan—if not for all the stitches, at least for the Turkey work. In this design you can do one line of Turkey work or many, and make them small and tight, or big and extravagant.

I stitched Turkey Work inside the marked areas.
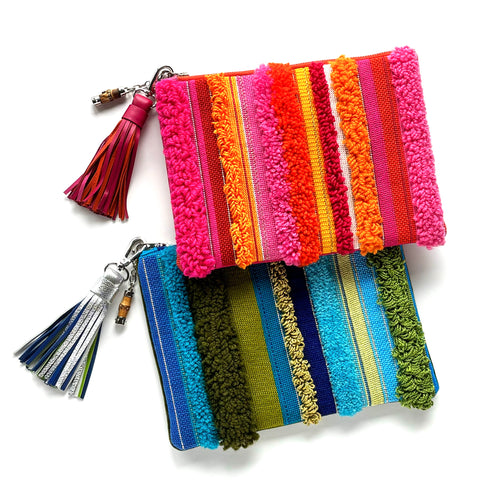
As part of your planning, you need to consider how much neighboring territory your Turkey work will cover up as it spreads out. Above is a general layout of where I stitched Turkey work in the pink and orange clutch. Don't be shy about putting small marks on the canvas where you should stop! The higher your Turkey work in its finished state, the more it will cover the columns of stitching directly next to it. For my widest Turkey work stripes, at least 6 or 7 columns of stitching on either side were covered up by fluff!

For instance: In the pink/orange clutch (above, sections 16 and 17 in my stitch guide), from the right I stitched six columns of Basketweave turned 90 degrees, then 5 columns of Turkey work in the orange, 3 columns of Turkey work in the pink, and the rest of the big pink section in Reverse Basketweave. In the orange section, nearly all of that Basketweave is covered. If I made the Turkey work shorter, or used a different thread, the look would be quite different.
Also important: It’s best to stop about three to six stitches from the top and bottom edge (just use Basketweave for that last bit) to facilitate finishing. Otherwise your fluff can get caught in the seams!
I like to stitch the Turkey work LAST. When you create big, fluffy loops, it can be a beast to stitch the intersections right next to it--you have to push the fluff out of the way with every stitch. I stitch a row of Turkey work right into the next vertical column--this gets a little tight, but I like to cover that canvas entirely.

 It would have been much easier to stitch without all that fluff in the way!
Threads for Turkey Work
As with all stitching, the choice of threads is up to you, but after a lot of experimentation, wool and cotton definitely stood out as the best options for me when using Turkey work in this project. Wool has natural kink to the fibers which helps the loops stand up and have some structure, whether cut or uncut. Specifically, Appletons tapestry wool (good volume) and Waverly wool (curly texture when uncut) were my favorites (you can buy both Appletons and Waverly wool from HM Nabavian in New York--they ship very quickly), followed by DMC pearl cotton size 3 (nice shine when uncut). Silk & Ivory and other silks and silk blends were too soft and floppy for me--everything that makes those threads nice to stitch with worked against them with Turkey work.  My best advice: Experiment! Use your stash to test anything and everything to stitch Turkey Work. I tried just about every thread I have to find solutions that worked for me.
How to Stitch Turkey Work
There are several ways that you can execute Turkey work. I recommend watching videos online—no diagram does the stitch justice! I watched the one on Needlepoint.com (they also have an online class that teaches several varieties of Turkey work, and if you can find an in-person class at your local shop, even better). I found this technique to be the easiest and fastest version, but what is most important is that you push all of the loops up, not down, as you stitch—everything should stand up tall and proud, not lay down flat.
I recommend working on stretcher bars. This will keep your canvas taut and make it easier to execute this stitch.

**This stitch can be worked in either direction. The diagram shows left to right, but you can also reverse the stitch and run it right to left.**
Go slowly and be patient. You will mess it up a few times before you get it!
How to start: Go down in hole 1, leave a long tail. No need to tie a knot.
Go up in hole 2, directly to the right.
Go down in hole 3, to the left of where you started. This little loop from hole 2 to 3 is left loose and pushed up and out of the way so you can see what you’re doing. Don’t pull it taut yet, as it will get in your way. Up!
Now come up in the first hole (1/4), trying not to split threads as you do. It’s a little crowded in there! Pull the thread up and tight (this pulls that horizontal stitch from 2 to 3 taut). The thread is now knotted around your canvas and should be very stable.
Now make a loop of whatever height you want as you go down in the hole to the right of the last filled hole (5). It's better to make the loops too big than too small. Hold the loop up with your fingers, don’t pull it down into the canvas.
Come up in the hole to the right (6) and make your loose loop, keeping it pushed up, as you go down in the hole two to the left (7). There should be a nice little space to go down in, formed by the far edge of the last horizontal stitch that locked the previous knot.
Ending a thread: after you come up in the center of a stitch, just cut your thread instead of moving on to the next loop. You don’t need to bury your thread because you just tied a knot around the canvas!
You can run the Turkey work in short horizontal rows, but for this project I found it much easier to turn the canvas 90 degrees and run the Turkey work in long lines. I get in to a rhythm and it actually goes pretty fast! You can work from left to right or right to left.
 The back side of Turkey work (pink) and basketweave (blue) on another project.
Be careful when you pull your thread up through the canvas—the thread can slip through the intersecting warp and weft and cause your Turkey work to get out of step (you can tell this has happened if you look on the back and see that your row is out of alignment). I try to pull up (about 45 degrees toward the top of the canvas) and in the direction I am stitching to prevent this.
Even if I plan to cut my Turkey work, I try to keep all of the loops the same height as I stitch so I leave my options open in case I change my mind! As I am creating a new loop, I hold the previous loop in my fingers, pulling them both taut and to the same height. Some will say you can use your needle or pencil to get precise loops, but I was happy with the simpler approach.
I tried to stagger the rows so that the loops were not exactly aligned. This is not critical—I usually forgot!
When moving from one row to the next, you can either end the thread and start the next row afresh, or I sometimes made up a weird turn. Remember, you just need three holes to execute the knot! As long as the thread is not going to pull out, no one will see a wonky stitch in the fluff.

IMPORTANT NOTE ABOUT FINISHING: Be kind to your finisher and end the Turkey Work *at least* 3 stitches from the end (where the bag will be sewn together)--even 5 or 6 if your Turkey Work is very long. Just use Basketweave to fill out these last stitches. This will prevent your tufting from getting caught in the seams (worst case, your finisher may have to give the loops a trim to make it easier to sew the layers of your bag together).
I finished my own bags and literally taped down the fluff to make sewing more manageable. As you can see in the image above, I should have ended my Turkey Work with more space from the edge in the blue and green bag—sewing it together was tough!
Cutting the Turkey Work

I left all of my Turkey work uncut until after the bag was sewn together. I like the look of the uncut loops, so I left a fair number of those stripes intact (though I need to see if the loops catch on things when I carry the bags?).
I cut some Turkey work stripes and left others uncut; some are cut to a low pile and others I left others nice and tall. Start slowly—trim a little, see how it looks, then go back. I used curved Gingher embroidery scissors to trim—the curved edge affords me a bit more control.

If you are cutting your loops, dig in and make sure you get them all to ensure an even trim. Look at the Turkey work from all angles, fluff it around, and make sure things are nice and even (if that’s the look you’re going for!). I also under cut the stripes a bit, meaning that the outer columns are shorter and gradually reach the maximum height at the center. This creates a nice rounded mound of fluff, and has the added benefit of narrowing the stripe and allowing more of the neighboring stitches to be seen.
Depending on the threads you use, you might want to experiment with a Bunka brush. This small tool will brush out your thread and fluff it up. I didn’t use this, but it is an option.
The good news is that cutting your Turkey work can be an evolving process, meaning that you can keep trimming the fluff over time if you decide you don’t like the look!

I hope you can use some of these tips to add more Turkey work to other projects! It's fun to think in three dimensions in your stitching.
Let me know if you have any questions! And I'd love to see your project after you've stitched it!
Jeni,
On the turkey work stripes, I should use basketweave 3-5 rows on both ends within the pattern? I also noticed on your canvas basketweave outside the painted canvas all around. Do you recommend doing both? I am having a blast with this canvas and learning so many new stitches. Thank you, Susan
Jenni,
Thanks so much for designing 2 gorgeous canvases and this wonderful in-depth tutorial on turkey work and stitch planning. Like you, I am devoted to basketweave and am expanding my horizons into decorative stitches – scary and fun at the same time. I can’t wait to get started on my new fluffy clutch! I’ve purchased the stitch guide and can’t wait to read it! I also appreciate that your guide is an extremely reasonable price. It’s very helpful to those of us in fixed incomes. Thanks for everything! Happy stitching!